While attending the most recent Develop@City day this summer, I visited the City Excel Forum* booth, when Dionisis Dimakopoulos, who was staffing it and contributes to the City Excel Forum, asked me what tasks I use Excel for. I use Excel for So. Many. Things., but in the moment my mind went blank. Then the notorious, essential and impending Subject Librarian task sprang to mind: Reading Lists.
I am lucky because Cass publishes the timetable with most of the module information well in advance. It tells me which modules are running, how many students will take them, and who will be teaching them. Having lectures on board is critical because it keeps my lists (and collection!) consistent with what students will actually be reading and borrowing.
I am also lucky in that most of my lecturers are attentive and care that their students can access readings. Emailing them gets a response, especially when it’s an email that addresses them personally, rather than a ‘Dear all’. The problem for me is that in the past, it has taken a week or more to send out essentially the same email over and over again with a few details changed. Over the course of the academic year, I might send 130 of these emails. Dionisis’ solution for me was Mail Merge.
You might remember Mail Merge from early Microsoft Office training at School. For most nine year-olds, knowing how to send a personalised email en masse doesn’t especially address their immediate information needs. As Hilary Mantel recently wrote, ‘We are oblivious of information until we are ready for it’. With that in mind, here is how you too might utilise this ancient** magic for your emailing needs.
To begin you will need:
- A computer with Microsoft Office Suite, on which you have signed into Outlook with your City email address. I am using a slightly retro version – MS 2010 – so yours might look different
- A list of the recipients, including their names, email addresses and particularly relevant information about them – in my case it’s the module codes/titles.
- Standard text for your email.
Open Word select the tab labelled Mailings.
Click on the dropdown for Start Mail Merge –> Step by step Mail Merge Wizard. I do not tend to use the Microsoft wizards, but it seems this wizard went to Hogwarts. In this blog post, the Mail Merge Wizard Panel is where the magic happens.
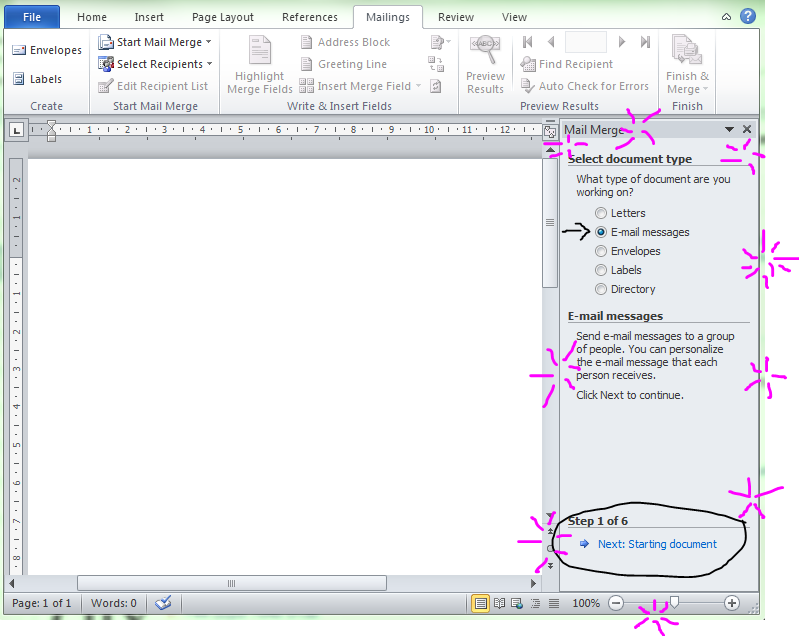
- Look to the magic side panel on the right. Select E-mail messages at the top and click Next: Starting document at the bottom.
- I chose to go with the current template and then add in my own text directly in. You could use a different option and pull in an actual email if you want. The default option seemed simplest to me though. Click Next: Select recipients.
- This is probably the most time-consuming part of the process. Here is where you populate metadata that Outlook and Word will use to create customised emails and make it look like you wrote a customised email to each recipient. Select the option Type a new list –> Create… This will come up with a Microsoft Access list in which the metadata have been pre-formatted to suit the needs of the mass-media focused (i.e. us).
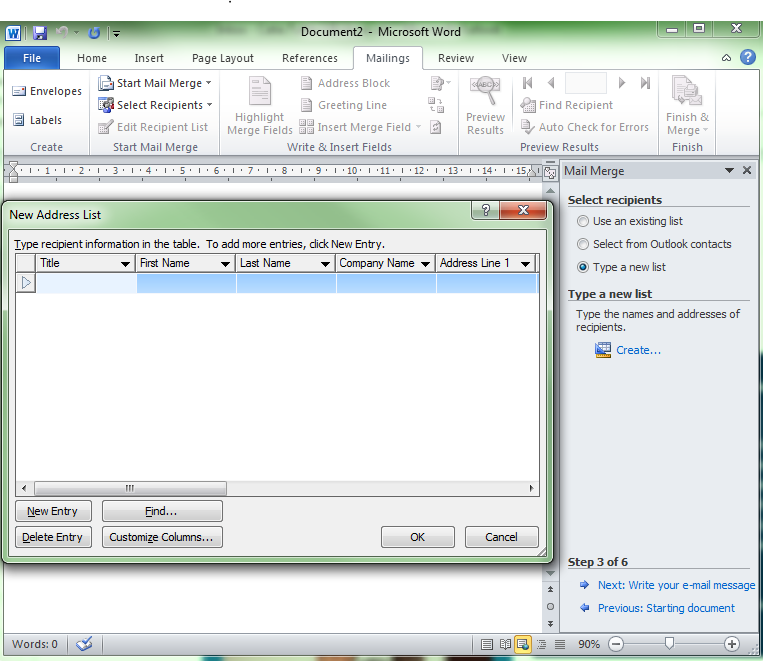
3a. Select Customize Columns… to get rid to useless columns like Address Line 1 and add useful columns, like Module details. It’s important that you include thorough information at this stage because the data you input into your Address list now are the data you will use later to customise your email.
In my first exercise in Mail Merge I used columns for: First Name, Last Name, Email address and Module.
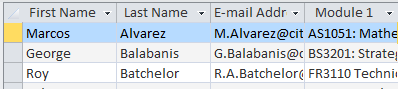
If you were to send an email to the wrong person, this is where that mistake could happen, so do double check through your list and make sure the email addresses match the names.
3b. When you click OK, it will prompt you to save your list. If you feel the need to get glass of butter beer or a chocolate frog to keep you going you can go back later to edit the Access File and then bring it into your Mail Merge in Step 3 if you decide to come back later.
3c. If you have a couple of different varieties of emails, you can select only the recipients you’d like to contact with version 1 and then go back later and select the recipients for version 2 based on other column criteria. Click OK and click Next: Write your e-mail message. I did this in a slightly complicated way, as most lecturers are teaching on one module, ten or so teaching 2 modules and only two lectures teaching 3 modules, which had implications on the text and use of commas and conjunctions. My solution: Send two separate mail merges and 2 regular old emails to the lucky guys teaching on three modules this term. They deserve it.
4. At this step you can add in your standard message. Do not add anything you don’t want everyone to see.
Some features to pay attention to at this stage:
- The customised greeting option on the right lets you choose the salutation word you’d like to use (e.g. ‘Dear’, ‘To’ or ‘Hi’) as well as the way in which you would like to address your recipients (e.g. Dr Dorothy Dummy, Dr Dummy, Dorothy, etc.), so there is no need to write in ‘Dear,’ into the main text of your work.
- Select More items…, to add other metadata from my recipients list about the module or other metadata you included.
- ‘Where is the subject line’ you ask? It comes in at stage 6. Don’t worry about it yet. I promise, you will have the opportuntity to state your purpose with this Mail Merge.
- Please note, because you are not working in Outlook, you will need to include your email signature in the document. Copy and paste it straight in from Outlook. Otherwise, it will not appear.
- Because you are working in Word, switch to the Home ribbon to access all of your favourite formatting options (fonts, sizes, and colours, oh my!).
5. This step features some pretty exciting wizardry (it’s also crucial to quality control) because the tool lets you preview how each email will appear to each recipient. Use the double arrow buttons in the Wizard Panel to witness HTML magic in action (*eh hem*…view emails and prevent mistakes) before you ‘complete the merge’ and email the masses a customised message with the click of a button. 6. On the wizard panel select Electronic Mail…, and behold the Subject Line. The only annoying thing for me was that I couldn’t personalise the subject line – there is probably a way to do it, but I am just a beginner. I kept the other fields as they were.
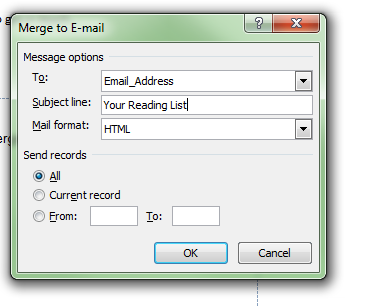
If you’re worried about where the final send step is – it’s this. Clicking OK in this box will prompt Mail merge to send a personalised email (the one you just previewed) to your entire recipients list at once. If you aren’t yet ready to commit, you can use the Previous option at the bottom of the wizard panel to go back. If you are ready to send, then click OK and Presto! a weeks’ worth of emails have now been sent. Now the real work begins…
A couple of notes:
- This was the first time I used mail merge, except when I sent it as a tester to a couple of unwitting colleagues. I recommend trying it out first before submitting your email to loads of people.
- This technology is old. There are loads of tools out there that you can use to send personalised email to the masses with way less faff. The problem is, they are not on my computer/I have to pay for them.
- Again, I am a first-time user, so if there are any Mail Merge pros out there and you have any other tips, or if I got something wrong please let me know.
- Microsoft Produced this handy guide to using Mail Merge, if you found any part of this confusing.
*Not only is the City Excel Forum is a fantastic way to make your job easier through Excel tips and tricks, but you will also see people who work in other departments around the university. It takes place every 6-8 weeks from 12-1pm in B200. Email organiser: Mark Brace (Mark.Brace.1@city.ac.uk) to sign up.
**1980, according to Wikipedia.